
My first DIY blog post is here! I'm going to show you in step by steps how to update an office whiteboard to make it look farmhouse or rustic looking like the picture below.

Supplies:
- Choice of whiteboard
- Paint brushes (there is no special paint brush I used here)
- Painter tape
- Waverly chalk paint (Truffle, mineral, and wax sealant)


Step 1: After you gather your supplies and prepare your painting area. Use the painters tape to protect the whiteboard on the sides. You want to make sure that you get all the four sides so that your whiteboard is protected by the smaller crevices while painting. I found this task to be tedious for me, but I'm a bit of a perfectionist when it comes to certain DIY projects.


Step 3: After the first coat dried I went over the edges with the Waverly mineral chalk paint in a back and forth swiping motion to create the rustic look that Katelyn describes in her video. This is where I think you can personalize the way you want it. I let the coat dry for about an hour or so before moving to the final painting step.


Step 2: I got the idea of this rustic look while watching KraftsbyKatelyn on YouTube. You can find the link to the video HERE. Even though this look was relating to a Christmas DIY I thought it would look really good for anything.You can use whatever paint brush, but I used a Waverly brush from Walmart. I painted all four sides and edges with Waverly truffle chalk paint. I let it dry about an hour or so before moving on to the next step.


Step 3: After the first coat dried I went over the edges with the Waverly mineral chalk paint in a back and forth swiping motion to create the rustic look that Katelyn describes in her video. This is where I think you can personalize the way you want it. I let the coat dry for about an hour or so before moving to the final painting step.

Step 4: Once the second coat of paint dries I used the Waverly clear wax sealant. The sealant will look like it has a color, but it goes on clear. You also don't need much of it as a little bit goes a long way. You want to make sure to get all the edges so that its protected. I let it dry overnight as after waiting an hour of drying it still wasn't quite done.
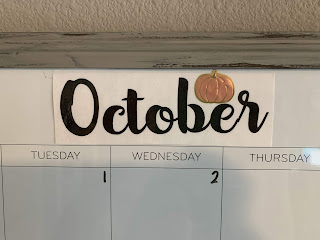
Step 5 (Optional): I wanted to have a cute changeable monthly sticker. You can use any font in word and adjust the sizing based on your whiteboard. I bought a font pack from Etsy and you can find the link to what I bought HERE. After you print out the font you use a laminating machine (I got one from Walmart for $20), once you laminate it you cut it out to your liking. I used tape to post it onto the whiteboard, and used a cute pumpkin sticker for decoration. This is a completely optional step and you don't have to do it unless you want to. I opted to do it since I don't have writing that looks this amazing.

There you have it a Farmhouse style DIY whiteboard! Such an easy, fun, and cool idea to re-purpose what you already have in your home. No need to go buy a new styled whiteboard just use what you have!
If you any of you make a similar creation please share them with me I'd love to see what you made!
I wouldnt have thought to redo it but I really like this idea.
ReplyDelete